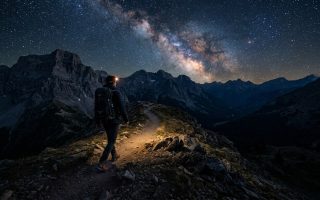
Standing at the base of a volcano with nothing but your pack and a trail map feels different than following a group leader with a flag. The mountain doesn’t care if you paid for a tour. It only responds to preparation, respect, and your ability to read the terrain.
Hiking volcanoes independently requires thorough research of permits, weather patterns, and trail conditions. Success depends on proper acclimatization, navigation skills, emergency protocols, and carrying the right gear for altitude and temperature swings. Most accessible volcanoes allow solo hikers, but preparation separates a memorable summit from a dangerous situation. Start with beginner-friendly peaks, build experience, then tackle technical climbs.
Choose Your Volcano Based on Regulations and Accessibility
Not all volcanoes welcome independent hikers. Some countries mandate guides for liability or employment reasons. Others leave trails completely open.
Research the specific volcano’s permit system before booking flights. Mount Rinjani in Indonesia requires guides by law. Acatenango in Guatemala does not. Villarrica in Chile sits somewhere in between, with seasonal restrictions.
Check these details for any volcano:
- Permit requirements and where to obtain them
- Guide mandate status and enforcement level
- Trailhead accessibility by public transport
- Seasonal closures due to weather or volcanic activity
- Emergency evacuation procedures and nearest medical facilities
Government park websites often have outdated information. Cross-reference with recent trip reports from independent hikers. Look for posts from the last three months, not three years ago.
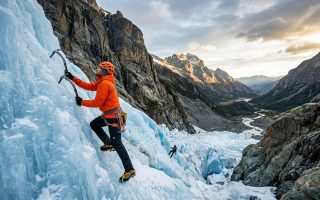
Some volcanoes have well-marked trails that don’t require technical climbing skills. Others involve scrambling over lava fields or navigating through cloud forests where visibility drops to ten meters.
Master Navigation Before You Need It

GPS devices fail. Phone batteries die. Cloud cover can erase every landmark you planned to use.
Download offline maps to your phone using apps like Maps.me or Gaia GPS. Mark the trailhead, campsites, water sources, and summit coordinates before you lose cell service.
Carry a physical topographic map and compass as backup. Practice taking bearings at home, not when you’re lost at 4,000 meters.
Learn to recognize trail markers specific to your volcano. Some use painted rocks. Others rely on cairns that previous hikers built. In volcanic terrain, paths can disappear under fresh ash or scree.
“The trail isn’t always obvious on volcanic slopes. Sometimes you’re following boot prints in ash, other times you’re counting switchbacks to know when to turn. If you can’t see the next marker, stop and scan methodically rather than wandering forward hoping to stumble on it.” — Solo hiker with 12 volcano summits
Take photos of trail junctions on your way up. They look completely different on the descent, especially if weather rolls in.
Plan Your Acclimatization Strategy
Altitude sickness doesn’t care about your fitness level. A marathon runner can get headaches at 3,500 meters while someone who walks casually might feel fine.
Most volcano hikes cross 3,000 meters. Many push past 4,000. Your body needs time to adjust to thinner air.
Follow this acclimatization timeline:
- Arrive at the base town two to three days before your hike
- Sleep at moderate altitude (2,000 to 2,500 meters) for at least one night
- Take a day hike to 3,000 meters and return to lower elevation to sleep
- Start your volcano ascent on day three or four
- If camping, ascend no more than 500 meters per day above 3,000 meters
Symptoms of altitude sickness include headache, nausea, dizziness, and unusual fatigue. If these worsen rather than improve with rest, descend immediately.
Carry acetazolamide (Diamox) if your doctor approves it. The medication helps some people adjust faster, but it’s not a substitute for proper acclimatization.
Understand Weather Windows and Volcanic Activity

Volcanoes create their own weather systems. Clouds form around peaks even when valleys stay clear. Afternoon thunderstorms are common above treeline.
Check weather forecasts from multiple sources. Local meteorological services often provide more accurate predictions than international apps.
Start summit pushes between 2 AM and 4 AM. This timing gets you above the cloudline for sunrise and off the exposed summit before afternoon storms build.
Monitor volcanic activity through official geological surveys. A volcano doesn’t need to be erupting to be dangerous. Increased seismic activity, gas emissions, or thermal changes can signal problems.
| Volcanic Hazard | Warning Signs | Your Response |
|---|---|---|
| Gas emissions | Strong sulfur smell, dead vegetation | Avoid low-lying areas where gas pools |
| Rockfall | Fresh debris on trail, cracking sounds | Move through exposed sections during cooler morning hours |
| Unstable ground | Warm soil, steam vents, ground vibrations | Stay on established trails, test footing constantly |
| Weather shifts | Sudden temperature drops, wall clouds | Descend immediately, don’t wait for lightning |
Some volcanoes have active craters you can observe from safe distances. Others have exclusion zones marked by signs or ranger patrols. Respect these boundaries.
Pack for Temperature Extremes and Self-Sufficiency
Volcanic summits can be 30 degrees colder than base camps. You might start hiking in shorts and finish in a down jacket.
Layer your clothing system:
- Moisture-wicking base layer for the sweaty ascent
- Insulating mid-layer for rest breaks and altitude
- Windproof and waterproof shell for summit conditions
- Warm hat, gloves, and neck gaiter for early morning starts
Bring more water than you think you need. Volcanic terrain often lacks natural water sources. Lava rock doesn’t hold streams. Budget one liter per two hours of hiking, plus extra for camping.
Food should be calorie-dense and easy to eat with cold hands. Nuts, energy bars, chocolate, and dried fruit work better than meals requiring preparation.
Your first aid kit needs altitude-specific items:
- Pain relievers for altitude headaches
- Anti-nausea medication
- Blister treatment for long descents on loose scree
- Sunscreen rated SPF 50 or higher (UV exposure increases with altitude)
- Lip balm with sun protection
A headlamp with fresh batteries is non-negotiable for pre-dawn starts. Carry a backup light source.
Know When to Turn Around
Summit fever kills people. The decision to turn back separates experienced mountaineers from reckless hikers.
Set a turnaround time before you start. If you’re not at the summit by that hour, you descend regardless of how close you are. Most accidents happen on the way down when people are exhausted.
Turn around immediately if:
- Weather deteriorates beyond your gear’s capability
- You develop altitude sickness symptoms that worsen with rest
- You lose the trail and can’t relocate it within 30 minutes
- You’re moving slower than your planned pace and won’t summit before your turnaround time
- Volcanic activity increases (new vents, stronger gas smell, ground shaking)
The mountain will still be there next year. Your safety depends on making the boring decision instead of the heroic one.
Handle Permits and Logistics Independently
Many volcanoes require permits even when guides aren’t mandatory. Obtain these before arriving at the trailhead.
Some parks sell permits online. Others require in-person registration at ranger stations. A few operate on honor systems with payment boxes at trailheads.
Budget for these typical costs:
- Park entrance fees (usually $5 to $30)
- Camping permits if doing overnight trips ($10 to $50)
- Environmental fees in some countries ($5 to $20)
- Parking at trailheads ($2 to $10 per day)
Getting to trailheads without a tour company takes more effort. Research public bus routes, shared shuttles, or local taxi drivers willing to do drop-offs and pickups.
Negotiate taxi fares before getting in the vehicle. Agree on pickup times and have a backup plan if they don’t show. Some hikers arrange for hostels to coordinate transport.
If you’re planning multi-day hiking trails across different terrain types, volcanic ascents teach you self-sufficiency skills that transfer well to other challenging environments.
Manage Camping on Volcanic Slopes
Camping on volcanoes differs from forest or alpine camping. Wind is constant. Ground is often too hard for standard tent stakes. Temperature swings are extreme.
Choose your campsite carefully:
- Look for natural windbreaks like rock formations
- Avoid depressions where cold air pools at night
- Check for loose rocks above that could roll down
- Stay away from steam vents or areas with sulfur smell
- Set up before dark because volcanic terrain is dangerous to navigate with only a headlamp
Bring rock stakes or extra cord to tie your tent to boulders. Free-standing tents work better than those requiring stakes.
A four-season tent handles wind better than three-season models. If you only have a lighter tent, position it behind rocks and use extra guy lines.
Sleeping bags rated for at least 10 degrees below the expected overnight low keep you warm enough. Add a sleeping bag liner for extra warmth.
Practice Leave No Trace on Fragile Volcanic Ecosystems
Volcanic landscapes look barren but they’re often ecologically sensitive. New plant species colonize lava fields slowly. Lichen can take decades to establish.
Pack out everything you pack in. This includes toilet paper, food wrappers, and orange peels that won’t decompose in volcanic soil.
For human waste, dig catholes at least 200 meters from water sources and trails. Bury waste 15 to 20 centimeters deep. Some high-altitude volcanoes require packing out solid waste in WAG bags.
Stay on established trails even when they’re faint. Shortcutting switchbacks causes erosion that takes years to heal in volcanic soil.
Don’t build new cairns. Use existing ones for navigation but resist the urge to make your own. Too many markers confuse rather than help future hikers.
Build Your Skills Progressively
Start with volcanoes that have clear trails, moderate altitude, and good infrastructure. These beginner-friendly peaks let you test your systems without extreme consequences.
Good starter volcanoes include:
- Mount Batur in Bali (1,717 meters, well-marked trail)
- Pacaya in Guatemala (2,552 meters, short approach)
- Teide in Tenerife (3,718 meters, cable car option for partial ascent)
- Mount Etna in Sicily (3,357 meters, multiple route options)
As you gain experience, progress to more challenging peaks with longer approaches, higher altitude, or more technical terrain.
Document what works and what doesn’t after each hike. Note your pace, how much water you actually used, which layers you wore when, and any gear that failed.
This personal database becomes more valuable than any guidebook because it’s calibrated to your body and hiking style.
Connect with Other Independent Hikers
You’re hiking solo, but you don’t have to plan solo. Online communities of independent volcano hikers share recent trail conditions, permit updates, and transport options.
Facebook groups for specific volcanoes or regions often have active members who just completed the hike you’re planning. Ask specific questions rather than general “any tips?” requests.
Trail apps like AllTrails and Hiking Project let you read recent trip reports. Pay attention to comments about trail conditions, not just star ratings.
Some hostels near popular volcanoes become informal hubs for independent hikers. You might find others planning the same ascent and can share transport costs or camp together while maintaining your independence.
Having another party on the mountain, even if you’re not hiking together, adds a safety margin. You can check on each other at campsites or coordinate emergency responses if needed.
If you’re interested in building a realistic travel budget that actually works, independent volcano hiking saves significant money compared to guided tours while delivering more authentic experiences.
Prepare for Common Volcanic Terrain Challenges
Volcanic landscapes present unique obstacles that differ from standard mountain hiking.
Scree fields cover many volcanic slopes. These loose rock surfaces slide under your feet. Descending scree requires a controlled sliding technique rather than normal walking. Keep your weight back, take small steps, and use trekking poles for balance.
Lava rock has sharp edges that shred normal hiking boots. Invest in boots with reinforced toe caps and thick soles. Bring duct tape to repair tears in gaiters or pants.
Volcanic ash behaves like deep sand. Each step sinks and slides backward. Progress is exhausting. Switchback trails help, but expect to move at half your normal pace through ash sections.
Sulfur gas near active vents can burn your lungs. If you smell strong sulfur, move to higher ground where gas disperses. Don’t linger in these areas for photos.
Sun exposure intensifies at altitude with no tree cover. Reapply sunscreen every two hours. Wear sunglasses rated for high-altitude use. Volcanic rock reflects UV rays upward, burning the underside of your nose and chin.
Your Summit, Your Terms
Guided tours have their place. They employ local people and reduce environmental impact through controlled group sizes. But they also move at the slowest hiker’s pace, stick to rigid schedules, and cost three to five times what independent hiking requires.
Learning how to hike volcano without guide gives you the freedom to start at 3 AM instead of 5 AM, to spend an extra hour at the summit watching the light change, or to turn around early if conditions feel wrong. You build skills that transfer to other mountains and develop confidence in your judgment.
The first independent volcano hike feels intimidating. The tenth feels natural. Start with accessible peaks, respect the mountain’s power, and trust the preparation you’ve done. The view from a summit you reached on your own terms looks different than one you were led to. Both are beautiful, but only one teaches you what you’re capable of.